The Rhodes 22 Discussion Group
< prior
Back to Month
Go to Thread

Matt Wilson
Inner Shroud Issues
2023-11-09; 22:53:46 EST
Member Since
2021-05-21
Posts: 111
Thank you GrahamSee the original archive post
On Thu, Nov 9, 2023 at 8:31 PM Graham Stewart <gstewart.gm at gmail.com> wrote:

> I had to replace the inner chain plates on my 76 R22 - or at least I
> thought I had to. Mine were loose and that worried me. As the chainplate
> was just a stainless steel tang that went through the deck I really could
> not tell what was holding it or how it might be secured. So I went in from
> the deck side with a grinter and removed everything down to the cabin
> liner.
> After grinding out the deck and core I realized that the chainplate was
> only attached to the underside core of the deck with a single 1/2" screw
> which, of course, was completely loose.. The core itself seemed dry and
> solid.
>
> My advice, without the benefit  of being able to open your pictures, is to
> go slow. I have attached a picture of the chain plate after removal so you
> can see what you are dealing with. Access to the chainplate is much less
> destructive if you reach it through the inner liner rather than from above.
> By removing small sections of the liner you should be able to find the
> screw and at the same time determine the condition of the core. If the core
> is good, you can fasten the chainplate more securely and patch the liner
> and be done with it. I didn't do that . The second picture shows what the
> deck looked like after I ground out the old chainplate.
>
> I decided that I didn't want to replace the chainplate as it was originally
> installed. It seemed to me like a system that would inevitably loosen and
> probably leak. I filled the cavity I created in the deck with an epoxy mix
> and then faired and repaired the deck. Doing so created a sizable area of
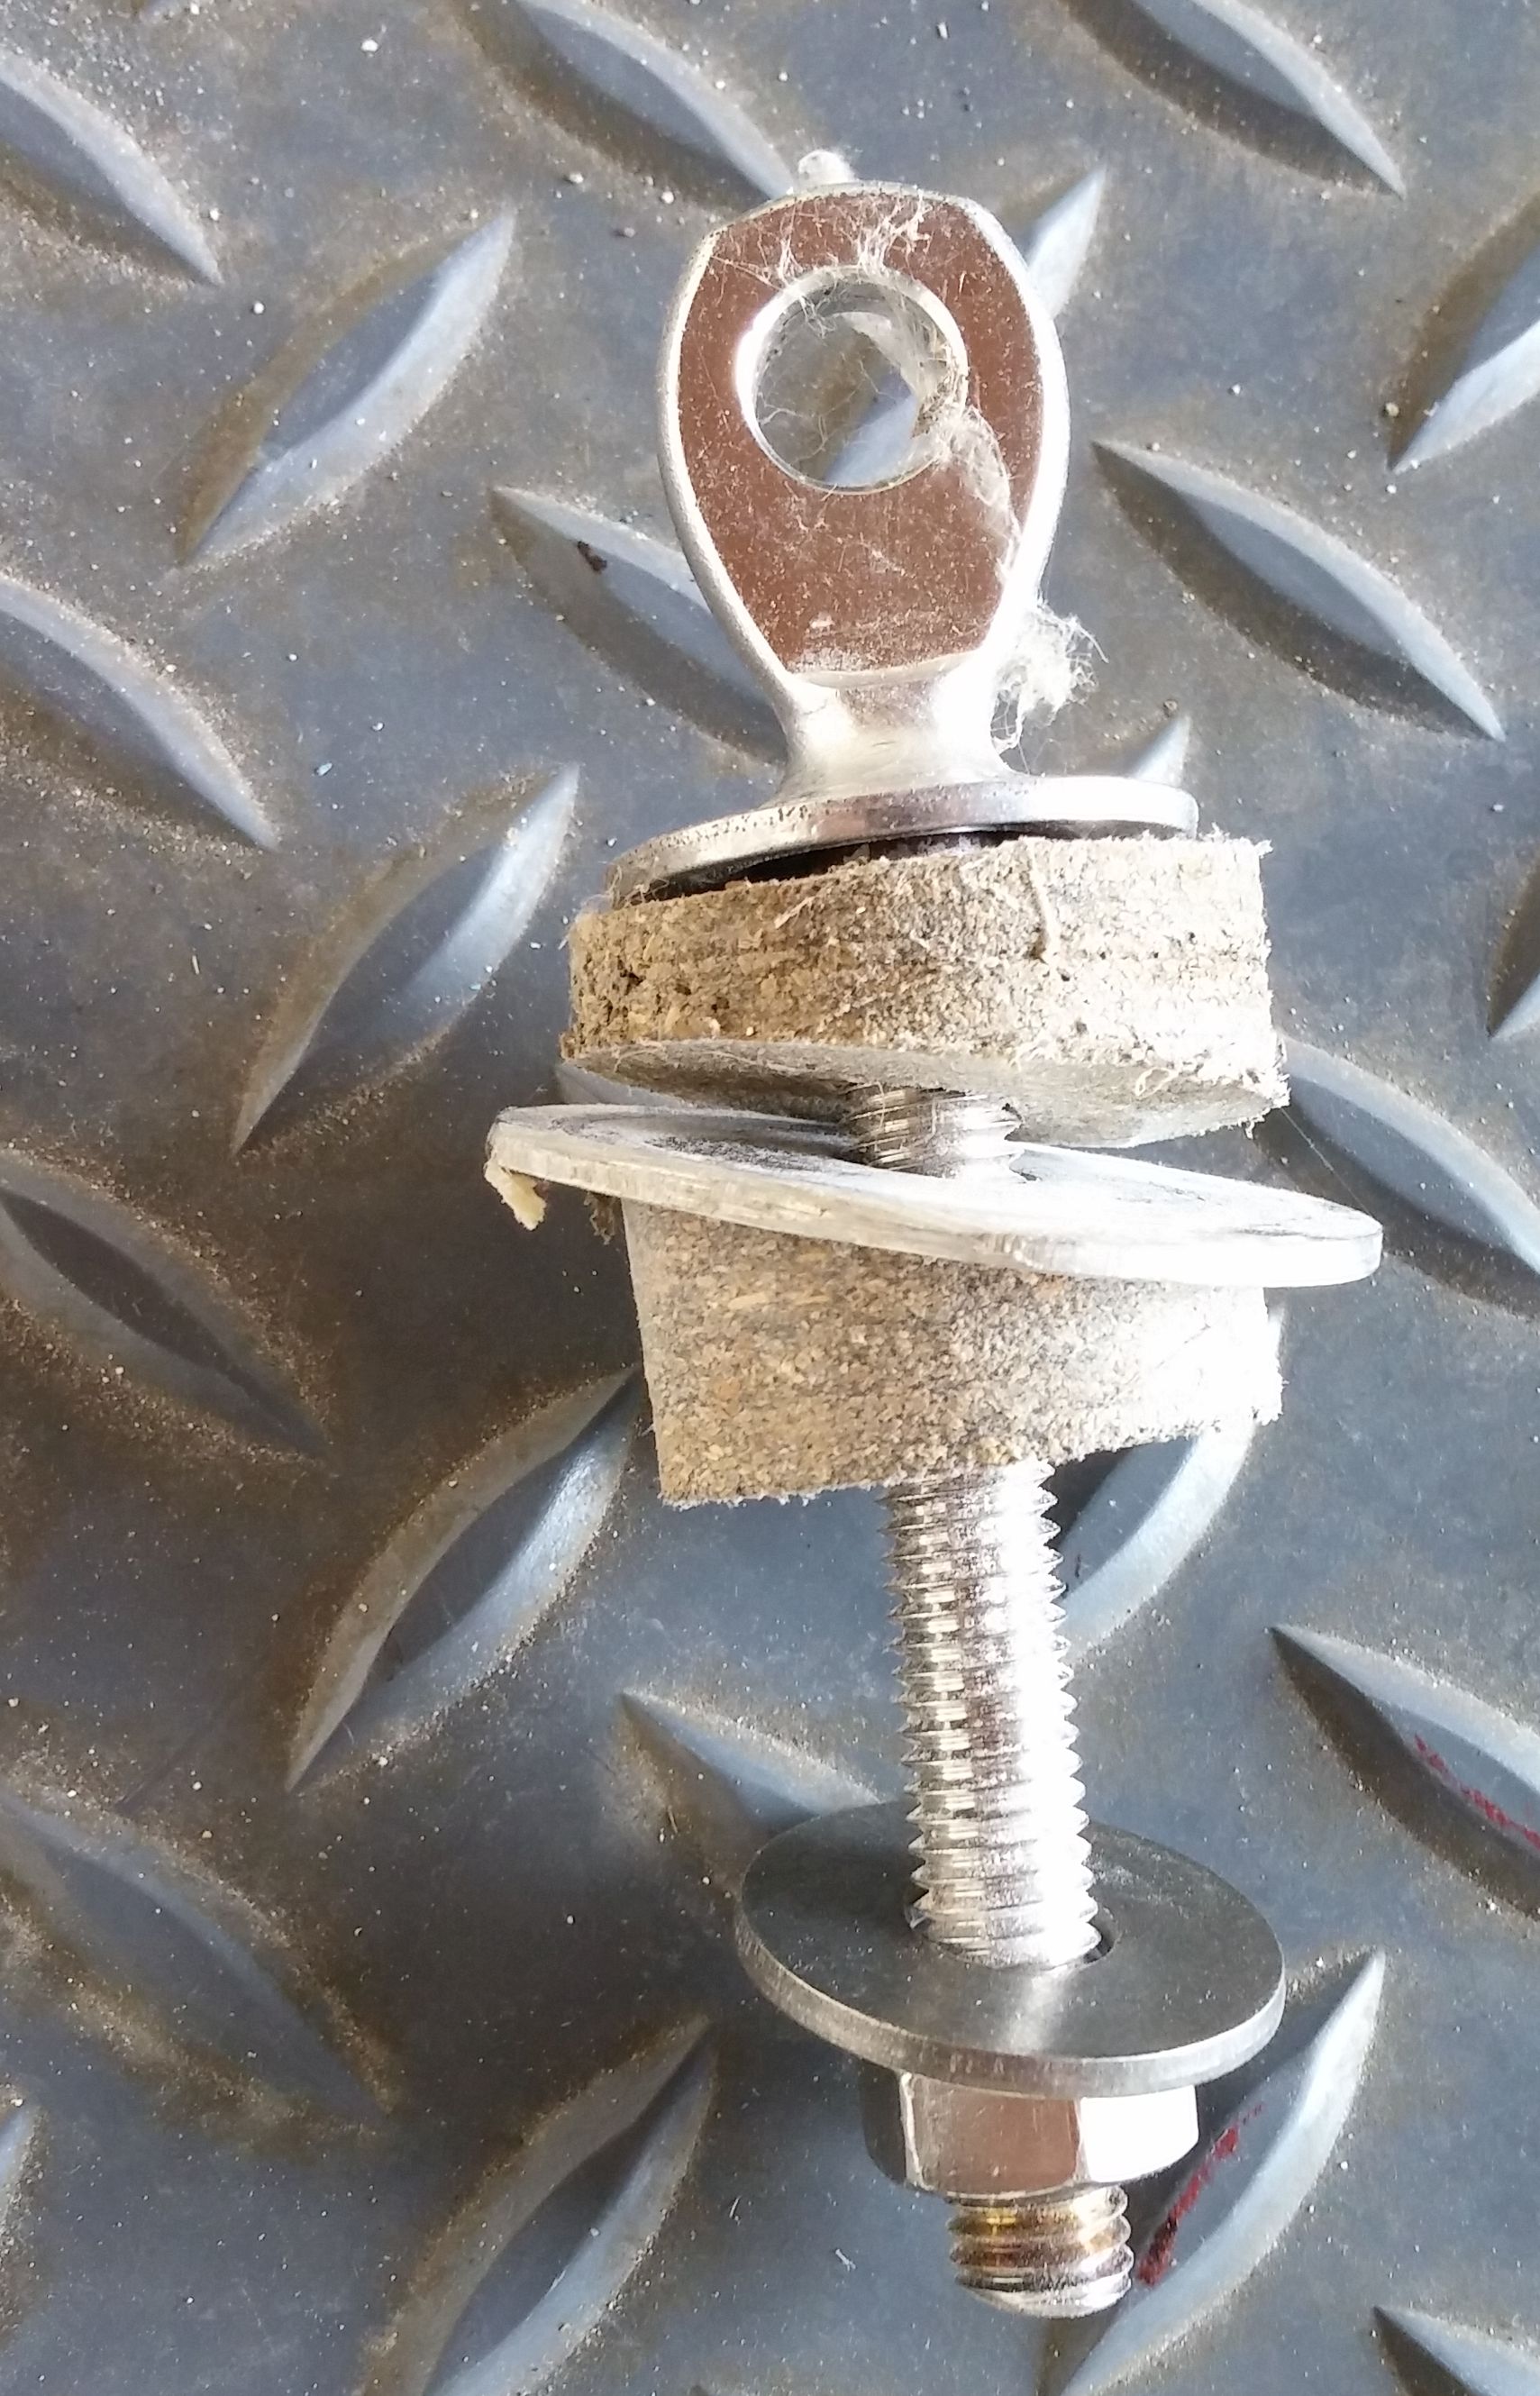
> solid epoxy mix through which I installed a ring bolt with shoulders - I
> can't remember what it was called but attach a picture. I made large
> washers from composite decking by using a hole saw.The picture shows the
> composite washer on both sides of the deck but in the end I didn't need the
> upper one. In this way the bolt was attached in a straight line with the
> shroud. The bolt went through the solid epoxy fill and was sealed with
> butyl tape. It seems very secure to me and has no wiggle.
>
> I was intending originally to attach new chainplates to the cabin sides but
> decided to replace the ports with a single piece of acrylic so there was no
> place to put the chainplates. In the meantime I inserted a new
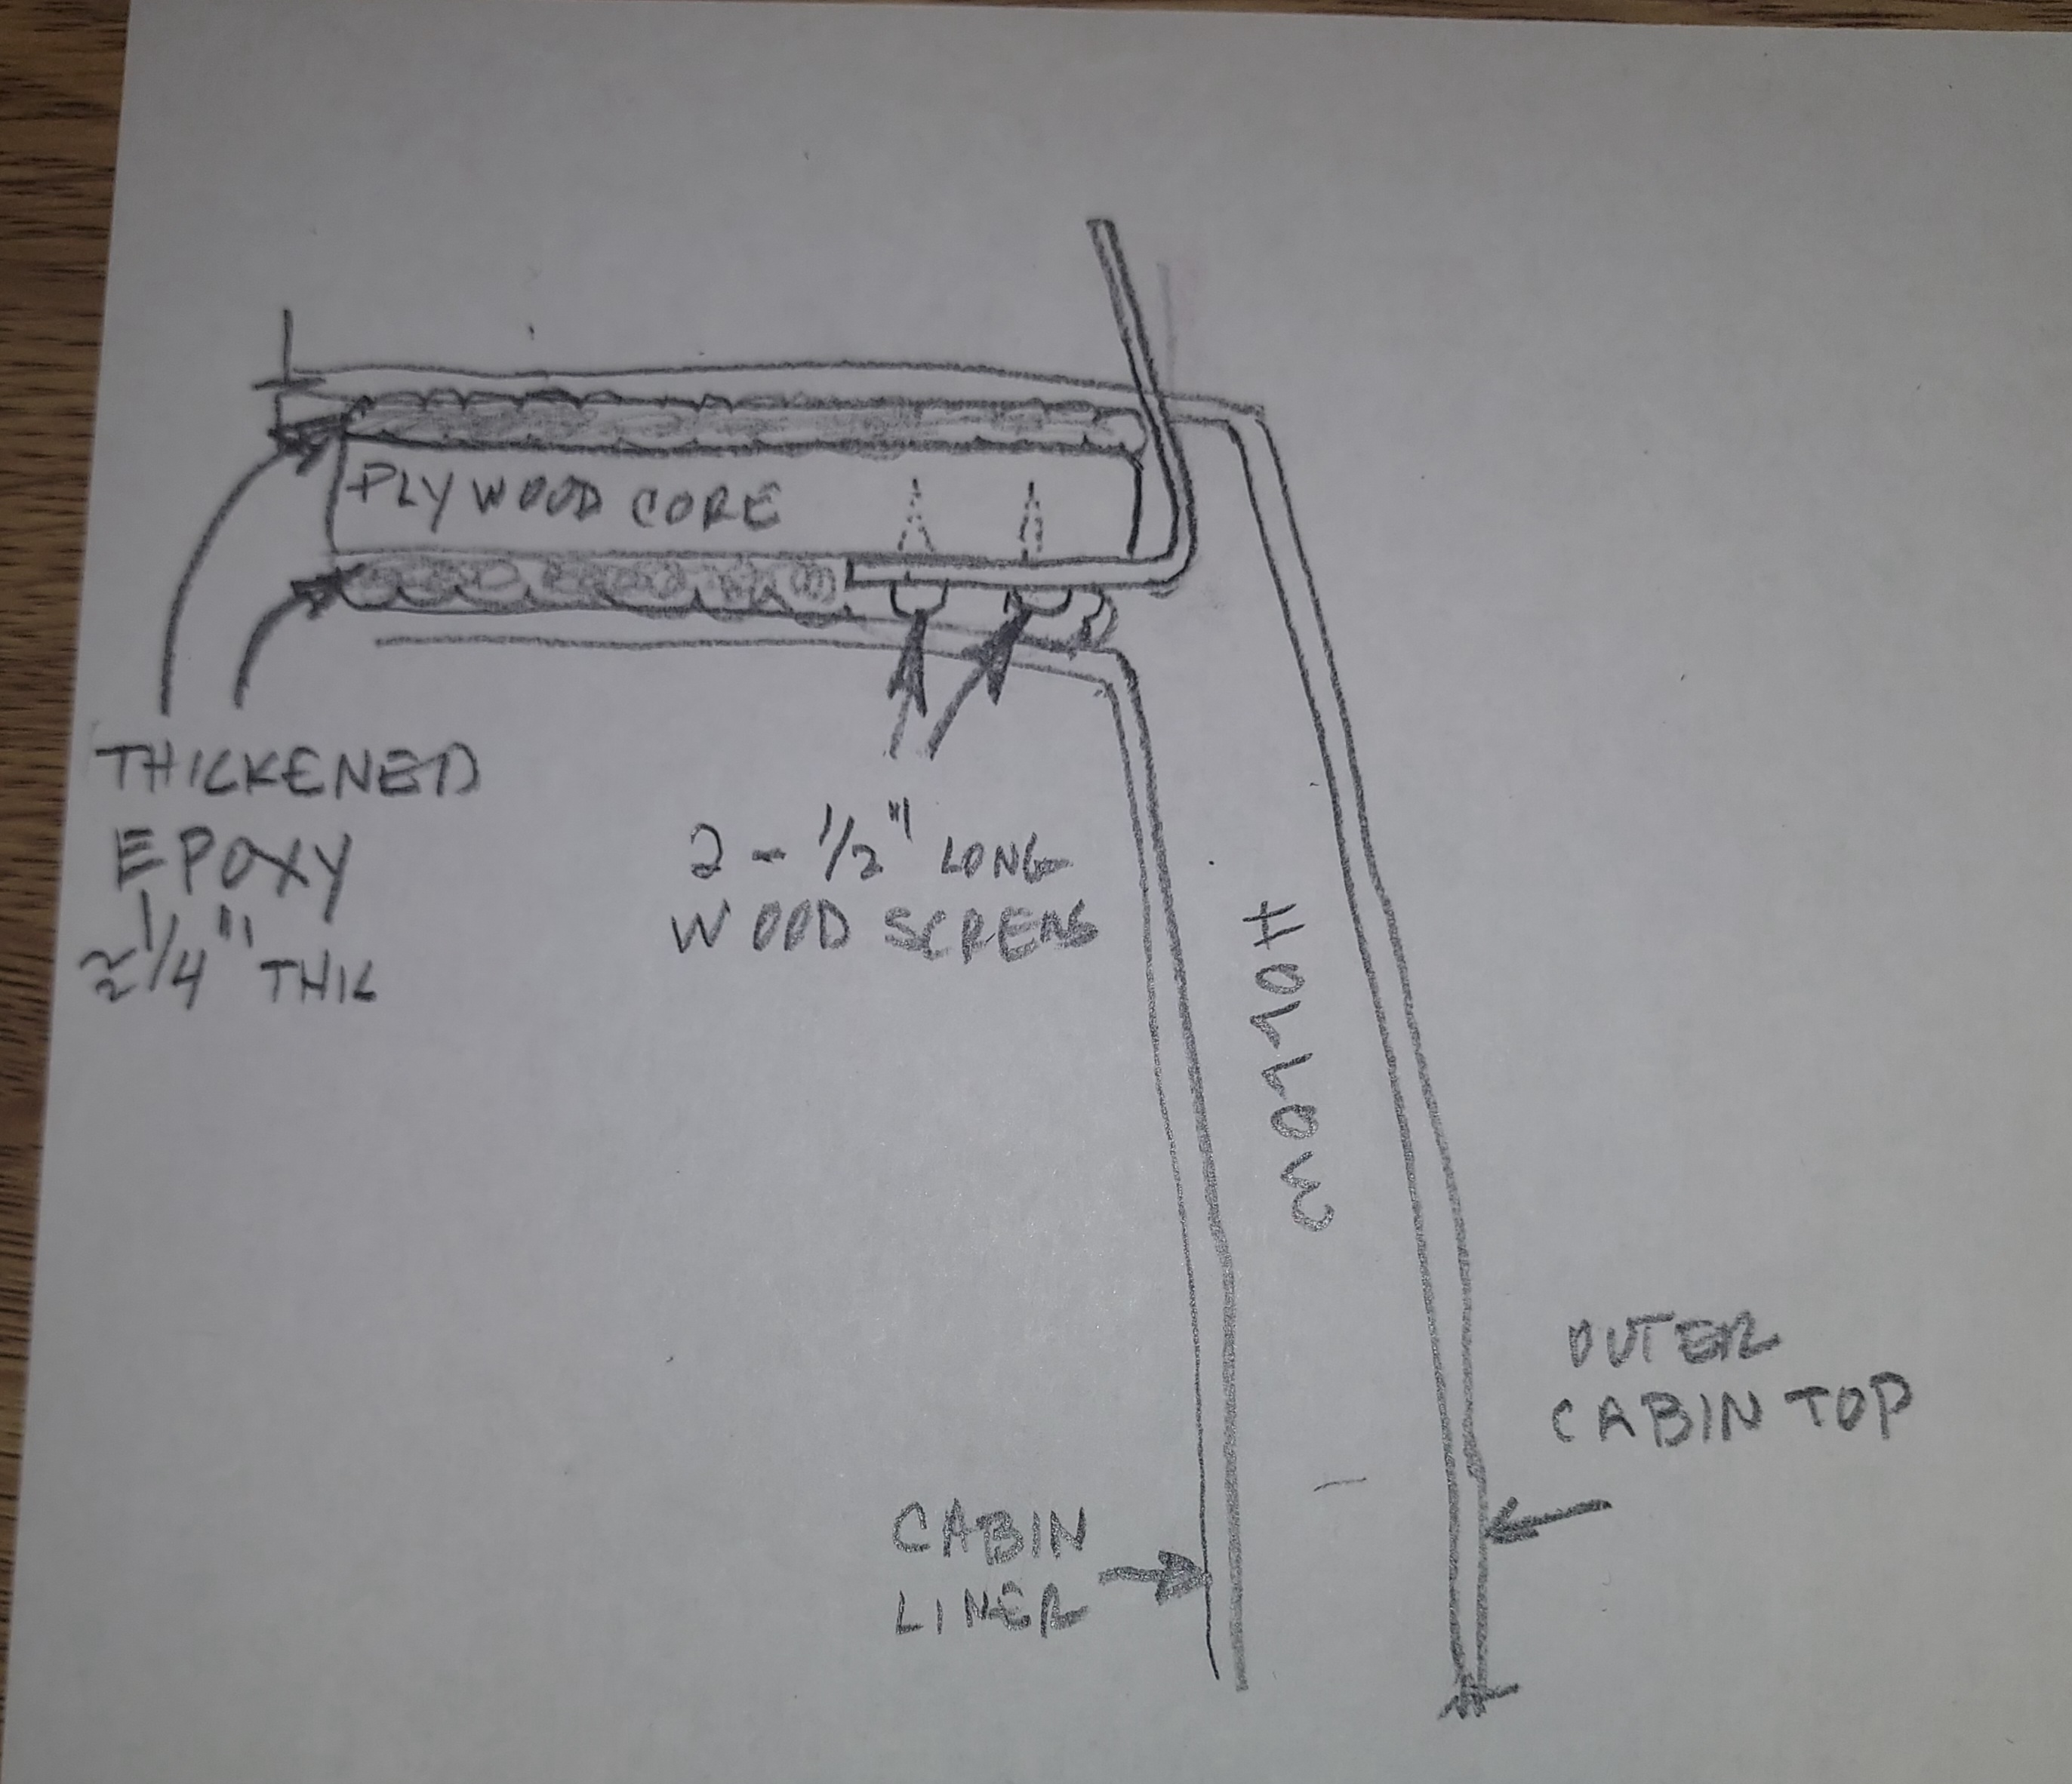
> plywood/epoxy core between the outer skin and liner along the sides of the
> cabin to provide for increased strength for the chainplates. I now know
> that wasn't necessary but it can't hurt in my case given that I
> dramatically increased the size of the port openings. I am telling you all
> this so you won't be too confused by the pictures
>
> So, if you want to replace the chainplates, you might want to consider this
> use of shoulder bolts once you know the condition of the deck core.
>
>
>
> Graham Stewart
> Agile 76
>
>
> On Thu, Nov 9, 2023 at 12:39 PM Matt Wilson <mwhornblower at gmail.com>
> wrote:
>
> > Thanks Todd for your help and diagram.  How many more sails till this
> pulls
> > apart?  ;)
> >
> > Can I get by by attaching two metal plates above and below the deck after
> > resealing to keep moisture out or is it too compromised already? the
> plates
> > would the fiberglass mess.  I am just a casual lake sailor so I'm not
> sure
> > how much I want to get into this kind of project.
> >
> > Have you or anyone else on the list done this repair?  I'm a total newbie
> > to this kind of project.
> >
> > Matt W
> >
> > On Thu, Nov 9, 2023 at 11:15 AM Todd Tavares <tavares0947 at gmail.com>
> > wrote:
> >
> > > Matt,
> > >
> > > You may have no choice but to pull the hatch; which will aid in the
> > repair,
> > > replace the core, epoxy, glass etc.
> > >
> > > This quick sketch doesn't account for the hatch being so close to the
> > > chainplate but it shows how the cabintop is constructed.
> > >
> > >
> > > Todd T
> > >
> > > On Thu, Nov 9, 2023, 12:03 PM Todd Tavares <tavares0947 at gmail.com>
> > wrote:
> > >
> > > > Matt,
> > > >
> > > > There is a right way which involves a ton of work, and there is an
> > > > adequate way.
> > > > The hard way is cutting away the cabin top removing any loose, wet,
> > > rotted
> > > > or dry rotted core material. Then epoxy in new plywood core, re-glass
> > the
> > > > cabin top, fair paint.
> > > > The alternative is to cut an access hole in the cabin wall. (Cut the
> > > > chainplate with a die grinder to pull it out from above or leave it
> in
> > > > place). Then put the chainplate on the outside of the cabin wall and
> a
> > > > backing plate inside.
> > > >
> > > > But looking at your pics, you may have no alternative that to cut
> away
> > > the
> > > > cabintop.
> > > >
> > > > Todd T.
> > > >
> > > > PS. I'll try to make a couple of pencil sketches so you know what is
> > > > inside.
> > > >
> > > > On Thu, Nov 9, 2023, 11:30 AM Matt Wilson <mwhornblower at gmail.com>
> > > wrote:
> > > >
> > > >> Hello everyone,
> > > >>
> > > >> I am asking for guidance on my current issues with the forward inner
> > > >> shrouds.  It appears someone had over tightened them in the past and
> > > made
> > > >> some attempts to shore them up.  I will include pictures oif what is
> > > going
> > > >> on from below and topside.  My question is is this something I
> > > >> should completely rework or should I only make attempts to keep
> water
> > > out
> > > >> by sealing up the deck around them?
> > > >>
> > > >> Many thanks for your help,
> > > >> Matt Wilson
> > > >> Hornblower II
> > > >> White Bear Lake, MN
> > > >>
> > > >>
> > > >>
> > >
> >
> https://mail.google.com/mail/u/0?ui=2&ik=67ba79a2ab&attid=0.1&permmsgid=msg-f:1782103858061391360&th=18bb4e04549a3600&view=att&disp=safe
> > > >>
> > > >>
> > > >>
> > >
> >
> https://mail.google.com/mail/u/0?ui=2&ik=67ba79a2ab&attid=0.3&permmsgid=msg-f:1782103858061391360&th=18bb4e04549a3600&view=att&disp=safe
> > > >>
> > > >>
> > > >>
> > >
> >
> https://mail.google.com/mail/u/0?ui=2&ik=67ba79a2ab&attid=0.5&permmsgid=msg-f:1782103858061391360&th=18bb4e04549a3600&view=att&disp=safe
> > > >>
> > > >>
> > > >>
> > >
> >
> https://mail.google.com/mail/u/0?ui=2&ik=67ba79a2ab&attid=0.7&permmsgid=msg-f:1782103858061391360&th=18bb4e04549a3600&view=att&disp=safe
> > > >>
> > > >
> > > -------------- next part --------------
> > > A non-text attachment was scrubbed...
> > > Name: 20231109_121109.jpg
> > > Type: image/jpeg
> > > Size: 967576 bytes
> > > Desc: not available
> > > URL: <
> > >
> >
> http://rhodes22.org/pipermail/rhodes22-list/attachments/20231109/6e3ab441/attachment.jpg
> > > >
> > >
> >
> -------------- next part --------------
> A non-text attachment was scrubbed...
> Name: Chainplate.JPG
> Type: image/jpeg
> Size: 89771 bytes
> Desc: not available
> URL: <
> http://rhodes22.org/pipermail/rhodes22-list/attachments/20231109/ef2e3ebe/attachment.jpe
> >
> -------------- next part --------------
> A non-text attachment was scrubbed...
> Name: Chainplates removed 2012.JPG
> Type: image/jpeg
> Size: 87559 bytes
> Desc: not available
> URL: <
> http://rhodes22.org/pipermail/rhodes22-list/attachments/20231109/ef2e3ebe/attachment-0001.jpe
> >
> -------------- next part --------------
> A non-text attachment was scrubbed...
> Name: Lower chainplates with composite spacers.jpg
> Type: image/jpeg
> Size: 591134 bytes
> Desc: not available
> URL: <
> http://rhodes22.org/pipermail/rhodes22-list/attachments/20231109/ef2e3ebe/attachment.jpg
> >
> -------------- next part --------------
> A non-text attachment was scrubbed...
> Name: Filling lower shroud holes.JPG
> Type: image/jpeg
> Size: 69382 bytes
> Desc: not available
> URL: <
> http://rhodes22.org/pipermail/rhodes22-list/attachments/20231109/ef2e3ebe/attachment-0002.jpe
> >
> -------------- next part --------------
> A non-text attachment was scrubbed...
> Name: Filling cabin sides with plywood (2).JPG
> Type: image/jpeg
> Size: 187831 bytes
> Desc: not available
> URL: <
> http://rhodes22.org/pipermail/rhodes22-list/attachments/20231109/ef2e3ebe/attachment-0003.jpe
> >
>
Message to Webmaster:
To use your email application to send a messsage to the webmaster rather than this form, .
Post to the Rhodes 22 Email List:
Sending Post:
Your post is being sent...