The Rhodes 22 Discussion Group
< prior
Back to Month
Go to Thread

The Rhodes 22 Email List
Window replacement update
2015-06-02; 11:36:31 EDT
Member Since
2014-05-06
Posts: 3821
Graham, you should consider writing for Practical Sailor! GeoffSee the original archive post
On Tue, Jun 2, 2015 at 10:16 AM, The Rhodes 22 Email List <
rhodes22-list at rhodes22.org> wrote:

> For those who are interested in replacing cabin ports with acrylic panels,
> I thought I would bring you up to date on my highly scientific experiments
> using the method of attaching windows without using any hardware.
>
> My experiments were intended to demonstrate for me the strength of a joint
> using Dow Corning silicone # 795 and 3M brand tape VHB 4991 and the paint I
> intended to use to coat the inside of the acrylic panel.
>
> First, I joined some pieces of Lexan I had using the tape and the sealant
> and let it sit for 48 hours for the sealant to cure. At  48 hours the
> sealant is about 90% cured but it continues to cure for 72 hours. I
> couldn't wait that long. I attached a small piece of lexan (about 1.5" x
> 3") to a larger piece at a corner. I messed up the sealant with the result
> that I got some on top of the tape - which seems like a distinct
> possibility when I do the large panels so I was curious to see what effect
> that had. By leaving the smaller piece extending beyond the larger piece I
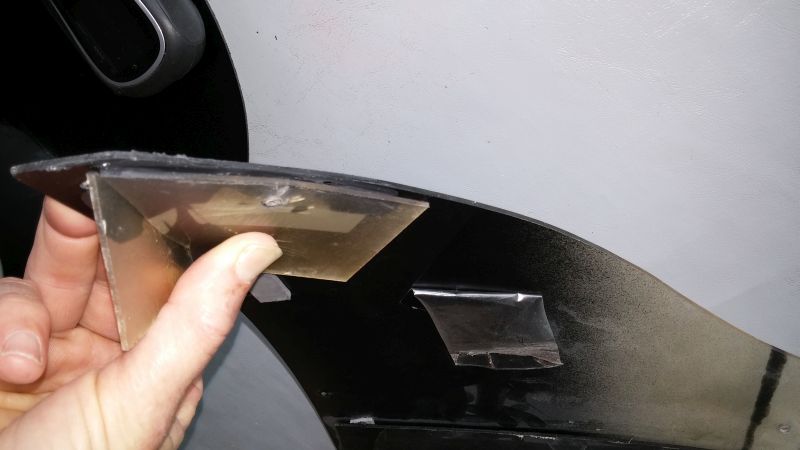
> had a tab that I could use to peal the pieces apart. I have attached a
> picture of what I call the "flex test".
>
> By holding the main piece down and lifting up on the tab I was able to
> bend the panels far beyond any curvature on the cabin side of the boat
> without any sign of the joint letting g. Also. the joint had enough flex
> that the panels could move past each other slightly to allow for a nice
> even bend. When I bent the joint to the maximum the lexan broke (see photo)
> before any sign that the joint was weakening. Lexan is very flexible and
> strong so that seemed to me to be a good sign although I should note that
> the Lexan was only 3/16" thick. I figure that if I can't break the join
> even on small pieces without destroying the Lexan, that has to be a very
> strong and flexible joint.
>
> As an aside, the sealant has a useful life of one year. When I ordered
> mine it was already 8 months old and expired in March 2015. I called 3M
> last fall to see if there was any way to extend the life of the material.
> The technical support person told me to seal it up in plastic and put it in
> my freezer - which I did. He then told me to test it before using it by
> laying out a bead and letting it sit for 3 hours. If it skinned over, it
> was good but if it stayed wet it will never cure - even though it looks
> fine coming out of the tube. I Had thought that old material would harden
> in the tube so that was potentially very useful to know. I have read online
> where others complained that this sealant never cured and I expect they
> were using material that was too old. In my case it appears the freezing
> worked as the sealant cured up nicely.
>
> Although the acrylic panels I am using are dark tinted, I wanted to make
> sure that the grey tape and white sides of the cabin did not show through
> so I needed to find a suitable paint to coat the inside. I wanted something
> that would adhere tenaciously to acrylic so that in turn the tape and
> sealant would adhere to the paint. I also wanted something that would apply
> by spray to give a perfectly even coat and preferably was fast drying.
> Articles I read advised using engine exhaust paint. The particular types
> suggested were not available locally and a ridiculous price to order by
> mail across the Canada/US border. Also I noticed that application
> instructions for similar paints available locally specified that it dries
> easily but does not cure until it is brought up to a high heat. That , of
> course , is not going to happen with acrylic so I was left wondering how it
> would work in an uncured state.
>
> I experimented with a number of paints - especially paints that are
> intended for plastic. The first time I did this in 1995 I used some sort of
> enamel that subsequently pealed of even though it was between the Lexan and
> the cabin side. It was thick, soft and had poor adhesion with Lexan. So I
> wanted something better than that.  I noticed that the paints I was testing
> went on thick and took a long time to dry. They also scratched off too
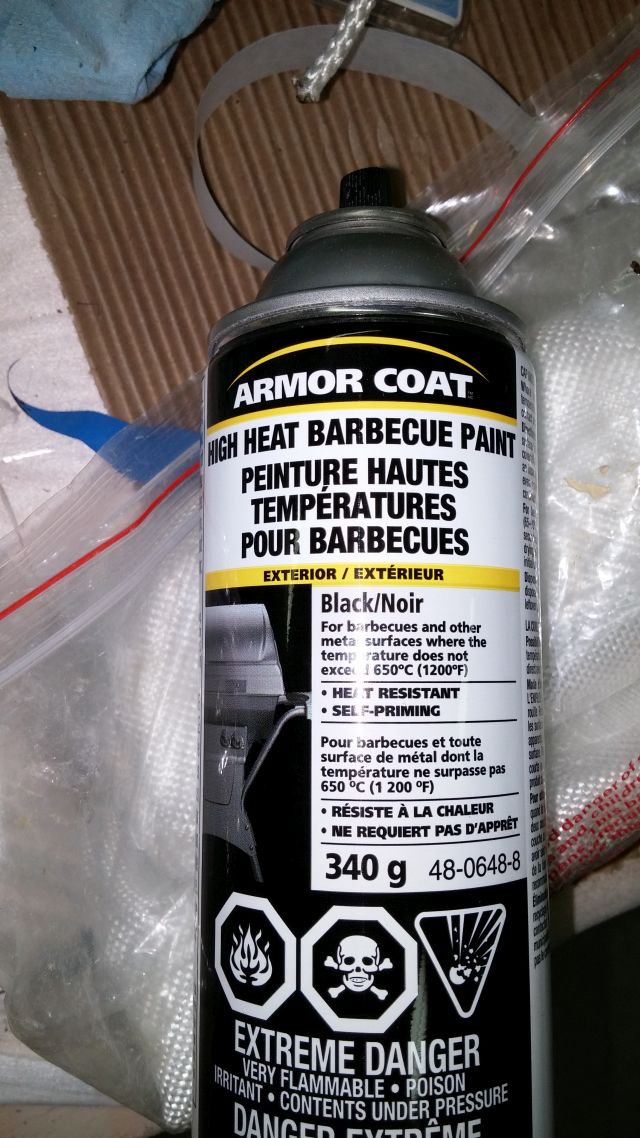
> easily for my liking. I then tried some barbeque paint that I had. The
> paint is intended for high heat applications but had a maximum temperature
> of 600 degrees - which is much lower than the exhaust paint but still much
> higher than anything the boat will ever face before I am jumping overboard
> and it does not require heat to cure. It also sprays on beautifully in thin
> coats, dries to touch in a few minutes - no dust problems - and can be
> recoated several time within an hour. That meant that I could apply
> multiple thin and even coats. It give!
>  s a satin finish rather than high gloss which I thought might make a
> better surface for the tape to adhere to. I first painted pieces of Lexan
> and clear acrylic and let it sit for about 3 months to see if there was any
> indication of incompatibility between the paint and the plastic. There was
> no sign of incompatibility that I could see.
>
> I tested the adhesion of the paint by trying to scratch it off soon after
> application and after several months and by applying a variety of tapes -
> duct tape and packing tape, house wrap tape etc, - and then peal it back
> both while the paint was fresh and after the tape had been in place for
> several months. As the flex test shows I also tried adhesion with the
> double-sided tape and, as noted, the lexan broke before the seal showed any
> sign of letting go. I also applied sealant, let it cure , and tried to
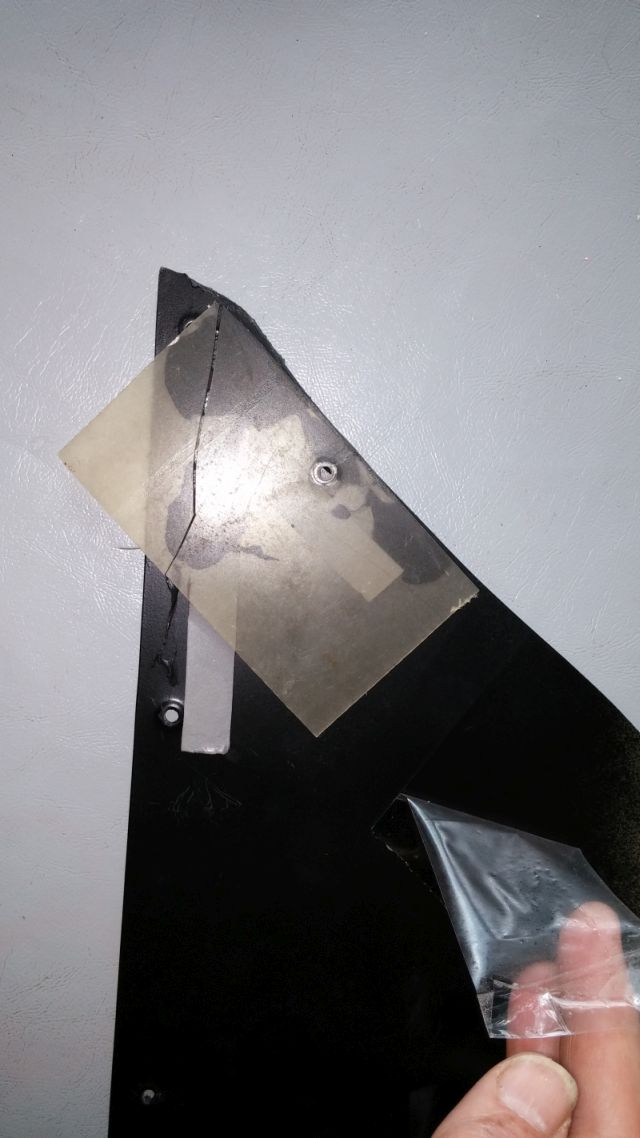
> remove it by pealing it back. The "paint test" is shown in an attached
> picture. It shows packing tape that had been left in place for several
> months. The tape was firmly attached but came off cleanly leaving the paint
> firmly attached to the Lexan. Scratching the paint with a sharp object left
> a scratch, of course,  but did not remove any of the surrounding paint. So
> I think this is a good paint for this application.
>
> To prepare the windows, I cut the acrylic panels from a 1/8" plywood
> template, routed a slight bevel on the outside edges, laid out where the
> opening in the cabin were, made a template for consistent openings made out
> of Formica (which works well because it is thin and hard) and then cut the
> protective paper around what will be the openings using the template and
> exacto knife. I then removed all the protective covering except where the
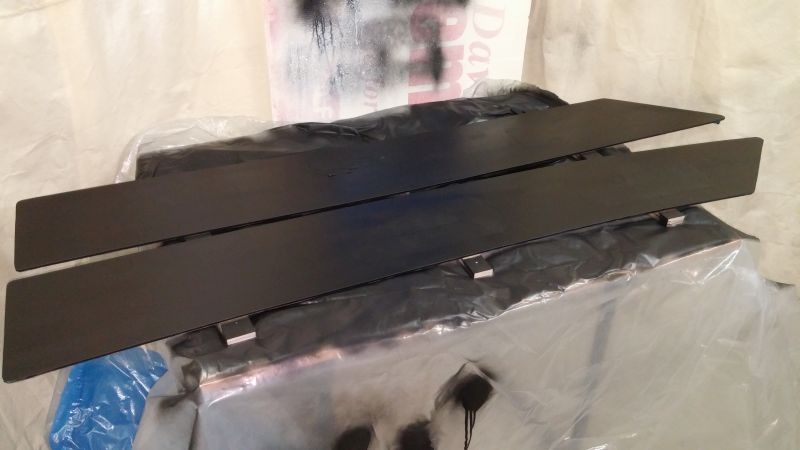
> openings will be and painted the pieces with four thin coats of barbeque
> paint. I have attached a photo of the painted pieces.
>
> After the acrylic is attached to the boat I will remove the masking tape
> on the outside of the acrylic panes, the tape on the cabin sides and remove
> the protective paper from the outside of the panels and the inside of the
> open part.  I tested whether I would be able to peel off the inside
> sections once it had been painted over especially given that it will be
> difficult to raise an edge once the panels are installed. I found that if I
> apply a strip of packing tape to the covering paper leaving the end folded
> over so I can grab it, when I peal it back the tape holds sufficiently to
> raise the protective paper cleanly avoiding the need to scratch up an edge.
> Hopefully that works in the real life situation. I would hate to have
> acrylic panels permanently attached with paper coving the opening that I
> can't remove.
>
> So I have chosen all the materials and tested them as best I can for
> suitability. I have also worked out a temporary clamping system to hold the
> panels in place while the tape and sealant cure. That might be unnecessary
> but given the curve of the cabin I don't want to take a chance on that
> part. I have masked the boat around the edge of the acrylic and sanded the
> paint on the cabin side so that is flat , smooth but dulled (220 grit). Now
> all that is left is to attach the actual panels and frankly that is what
> worries me most. While online instructions suggest applying the tape and
> sealant to the panel and then apply the panel to the boat, my thinking is
> that because the cabin side is a compound curve I would be better to apply
> the tape and sealant to the cabin and then press the panel into place.
>
> Time matters. I don't have forever to apply the sealant and remove the
> tape cover before pressing the panel on and worse still, I only get one
> chance to get the panel in the exact location. There is really no room for
> error. I have "rehearsed" placing the panel with my wife but that was
> without any of the tape or sealant. The cabin side has a moulded in edge at
> both the bottom and the aft end that are very helpful guides but one still
> need to make sure from the moment of first touch that everything is aligned
> perfectly so that the rest will wrap into place exactly where it is
> supposed to be. My hope is that I can rest the bottom edge and aft corner
> against the little raised edge first and then wrap the piece up into place
> at the top.
>
> If anyone has any clever ideas about how I could make the process idiot
> proof I would be forever grateful.  The idea of having to use a chisel and
> grinder to remove the misaligned panels has no appeal to me at this
> juncture. I think I will need a very good shot of Rummy's Mont Gay medicine
> to calm my nerves first.
>
>
> Graham
> -------------- next part --------------
> A non-text attachment was scrubbed...
> Name: Barbeque paint.jpg
> Type: image/jpeg
> Size: 178369 bytes
> Desc: not available
> Url :
> http://www.rhodes22.org/pipermail/rhodes22-list/attachments/20150602/916312ae/attachment.jpg
> -------------- next part --------------
> A non-text attachment was scrubbed...
> Name: Window flex test.jpg
> Type: image/jpeg
> Size: 52391 bytes
> Desc: not available
> Url :
> http://www.rhodes22.org/pipermail/rhodes22-list/attachments/20150602/916312ae/attachment-0001.jpg
> -------------- next part --------------
> A non-text attachment was scrubbed...
> Name: Window paint test.jpg
> Type: image/jpeg
> Size: 82200 bytes
> Desc: not available
> Url :
> http://www.rhodes22.org/pipermail/rhodes22-list/attachments/20150602/916312ae/attachment-0002.jpg
> -------------- next part --------------
> A non-text attachment was scrubbed...
> Name: Windows painted.jpg
> Type: image/jpeg
> Size: 54671 bytes
> Desc: not available
> Url :
> http://www.rhodes22.org/pipermail/rhodes22-list/attachments/20150602/916312ae/attachment-0003.jpg
> __________________________________________________
> To subscribe/unsubscribe go to
> http://www.rhodes22.org/mailman/listinfo/rhodes22-list
>
> For the list Charter and help with using the mailing list and archives go
> to http://www.rhodes22.org/list
> __________________________________________________
>
Message to Webmaster:
To use your email application to send a messsage to the webmaster rather than this form, .
Post to the Rhodes 22 Email List:
Sending Post:
Your post is being sent...